Counter
Followers
PingBox
Lil Star
This tutorial was written by me June '09. It is ©SarendysDreamz
Any similarity to other tutorials is coincidental.
Do not copy this tutorial post through any groups or claim as your own.
Supplies Needed
Scrap Kit I Used Called ‘Baby Time’ by Charly of Country Hollow Creations. You Can Downloaded The Kit Here
Mask Of Choice – I used JulesMsk4 Created by Jules Junk. You Can Download The Mask Here
1. Open New Transparent Image, 550 x 550
2. Open BabyMat (Image 156)
Copy - Paste As New Layer onto Working Image
3. Image - Resize 85% (all layers UNchecked)
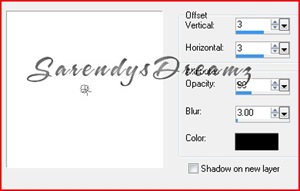
Effects - 3D Effects - Drop Shadow
2, 2, 30, 3
Add Drop Shadow again but this time -2, -2. 30, 3
4. Open Bow of Choice (I Used Image 33)
Copy - Paste As New Layer Onto Working Image
Image - Resize 75%
(all layers UNchecked)
5.Move to the Top Right
(See my Example)
Effects - 3D Effects - Drop Shadow
2, 2, 30, 3
6. Open Flower of Choice
(I Used Image38)
Copy - Pasted As New Layer onto Working Image
Image - Resize 75%
7. Move to the Bottom Left
(See My Example)
Effects - 3D Effects - Drop Shadow
2, 2, 30, 3
8. Open Bunch of Flowers (Image31)
Copy and Paste As New layer onto Working Image
Lower Opacity to 50
(I Rotated My Flowers 10 Degrees to the Right)
9. Open CHS-BabyGirl-Malakye
Image - Resize 50%
Copy and Paste As New Layer onto Working Image
10.Move to Bottom Left
(See My Example)
Move this Layer Below Flower Layer
Effects - 3D Effects - Drop Shadow
2, 2, 30, 3
11. Make Your Bottom layer Active
Layers - New Raster Layer
12. Open Paper of Choice (I used CHS-Paper4)
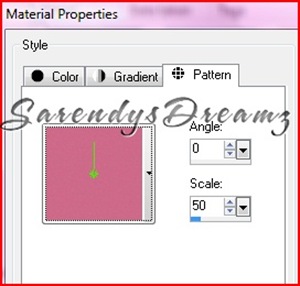
Open Your Materials Palette and Select Pattern
Find You Paper in the Drop Down
And Set as Follows
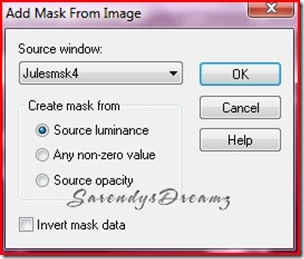
13. Open Mask of Choice
Layers - New Mask Layer - From Image
Find Your Mask In the Drop Down Menu
Layers - Merge - Merge Group
**I Duplicated My Mask Layer Because The Color Was Light**
14. Repeat Steps 12 and 13 Using A Different Paper Color
15. Image - Free Rotate
Rotate Your Mask Layer To Your Own Liking
16. Add Any Text You Would Like
17. Add Your Watermark and Any Copyrights
18. Layers - Merge - Merge Visible
19. Save as JPG
I Hope you have enjoyed my tutorial :)
Snag my Blinkie :)

My TOU
Please do not copy, rewrite or claim my tutorials as your own, this also means copy/pasting in other groups or sharing.
If you want to use my tutorials in your group, you may, but please just a text link. A thank you in my chat box would be appreciated.
If you have any other questions, feel free to email me, use my ping box, or leave a comment in the chat box.
Hope you enjoy my tutorials
Hugs
Sarah
Labels
- Tag Offers (3)
- Tutorials (21)


0 comments:
Post a Comment