Counter
Followers
PingBox
ECbabe Tutorial
This tutorial was written by me May '10. It is ©SarendysDreamz
Any similarity to other tutorials is coincidental.
Do not copy this tutorial post through any groups or claim as your own.
Supplies Needed
Scrap Kit I Used Is called 'ColoriDiPrimavera_TS' by Pspgirl. You Can find The Kit Here
Template Of Choice - I Used 'Freebie Template #2' by BitsNBobs Which Can Be Downloaded Here
Tube of Choice - I Used the awesome work of Elias Chatzoudis Which Can Be Purchased Here
Step 1 - Open Template of Choice
Delete the Watermark Layer
Select 'Main' Layer
Step 2 - Selections - Select All
Selections - Float
Selections - Defloat
Step 3 - Open Paper of Choice
Edit - Copy
Step 4 - Go Back To Template
Edit Paste as New Layer
Selections - Invert
Hit Delete on Your Keyboard
Selections - Select None
Step 5 - Select the Bottom Oval Layer
Step 6 - Repeat Steps 2 - 4
Step 7 - Select Top Oval Layer
Step 8 - Repeat Steps 2 - 4
Step 9 - Select the 'Babe' Layer
Step 10 - Repeat Steps 2 - 4
Step 11 - Add Elements of Choice
Resize as Needed
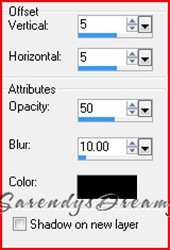
Step 12 - Add Drop Shadows To All Layers
I Used
Step 13 - Open Tube of Choice
Resize if Needed
Place Slightly to the Right
(see my tags for placement)
Add Drop Shadow
Step 14 - Delete Background Layer
Step 15 - Layers - Merge Visible
Image - Resize
(Approx 450px on longest side)
Step 16 - Add Copyrights/Watermark
Step 17 - Save as PNG
Who Me Tutorial
This tutorial was written by me May '10. It is ©SarendysDreamz
Any similarity to other tutorials is coincidental.
Do not copy this tutorial post through any groups or claim as your own.
Supplies Needed
Scrap Kit I Used Is called 'ColoriDiPrimavera_TS' by Pspgirl. You Can find The Kit Here
Tube of Choice - I Used One of the Posers From the Kit
Step 1 - Open a Transparent Image 500x500px
Step 2 - Open Frame of Choice
Resize as Needed
Activate Magic Wand
(feather and tolerance - 0)
Step 3 - Click Inside the Frame
Selections - Modify - Expand 2px
Layers - New Layer
Step 4 - Open Paper of Choice
Edit - Copy
Step 5 - Go Back to Image
Edit - Paste into Selection
Selections - Select None
Layers - Arrange - Move Down
Step 6 - Open Pspgirl_ColoriDiPrimavera_element10 or a Similar Element.
Copy and Paste onto Working Image
Resize as Needed
Step 7 - Place in the Frame (see mine for example)
Layers - Duplicate
Image - Mirror
Layers - Merge Down
Step 8 - Add Drop Shadows to Frame Layer and your Element Layer
Step 9 - Open Poser or Tube Of Choice
Resize As Needed
Edit - Copy
Edit - Paste Onto Working Image
Move to the Right
Step 10 - Add Any Other Elements
Resizing as Needed
Add Drop Shadows
Step 11 - Open Paper of Choice
Edit - Copy
Edit - Paste onto Working Image
Layers - Arrange - Send to Bottom
Step 12 - Effects - Reflection Effects - Kaleidoscope
Play with the Settings until You Find Something You Like
I Used 83, 24, 233, –69, 5, 0, 88 and Wrap
Step 13 - Layers - Merge All
Image - Add Borders
1px in Dark Colour
8px in White
1px in Dark Colour
Step 14 - Activate Magic Wand
Select White Border
Effects - Reflection Effects - Kaleidoscope
Use Same Settings As Before
Step 15 - Effects - 3d Effects - Inner Bevel
Step 16 - Resize to Around 425px
Step 17 – Add Copyrights/Watermarks
Snag my Blinkie :)

My TOU
Please do not copy, rewrite or claim my tutorials as your own, this also means copy/pasting in other groups or sharing.
If you want to use my tutorials in your group, you may, but please just a text link. A thank you in my chat box would be appreciated.
If you have any other questions, feel free to email me, use my ping box, or leave a comment in the chat box.
Hope you enjoy my tutorials
Hugs
Sarah
Blog Archive
Labels
- Tag Offers (3)
- Tutorials (21)


